Home
Networking project notes. Home
Networking project notes. |

Colin A. McGregor's
Home Network
My home networking project. One of the things I quickly learned about
doing a home computer network is there didn't seem to be a lot of
literature about home networking out on the net. Especially when your
focus is computer networking (as opposed to say doing the ultimate in
house sound system). What follows are my notes regarding some of what I
learned by doing my idea of a good home network.
I also assume that you have (like me) looked at the other networking
options like wireless networks, and decided that they fall short in some
way or you think that a hard wired network running through the home is a
neat idea.
Also, keep in mind that while what follows is written from the
viewpoint of someone doing a first rate home network, the most of the
following info could just as easily apply to someone wanting to wire a
small office.
The problem: A two story 3 bedroom house built in the mid-1920
that I wanted to wire primarily for a home computer network.
Some strong points in the house's favor, a mostly unfinished basement
(with the finished part of the basement causing much more than it's share
of trouble), and an unfinished attic. So, except around the finished area
of the basement there is an (fairly) easy path to run wires into the walls
either from below or above. Another hidden strength in the house turned
out to be the fact that heating for the house is via hot water. A new (hot
water) furnace was put in a few years ago, the new system did not need all
the pipes the old system had used, so there was a small clear (and unused)
path basement to attic (sort of, and a lot more about that later). The one
big trouble area was that finished basement area where I ended up ripping
out part of the ceiling and part of one wall in order to install
cables.
The computers consist of:
- A Mythbuntu Linux box acting as a media server
- Two Linux machines that act as both X-Windows boxes and servers
- A Sun Blade
- An Intel based Apple iMac
- An early (ver. 2) Linksys WRT54G box running Tomato Linux acting as router
- Several other boxes in different stages of (dis)repair that make periodic visits to the network
The wiring: My focus in all this was putting in computer
networking cable, with phone lines and coax cable (for cable modem/cable
TV and amateur radio) being very real but secondary concerns. I did not
bother with the likes of cable for in house stereo speakers.
The wire that I used for the computer network was all Category 5 (ie:
Cat 5) cable. When I first set-up my network I didn't see any need for speeds over 10 MB/sec.. Then I started moving ISO image files around
the house (for the project I wrote about here: http://www.linuxjournal.com/article/7127). Then I started moving video files genereated by the
MythTV program... So, 100 MB/sec. networks went from not needed, to desirable, to their current, I couldn't live without and faster would be
nice (but currently more expensive than I can justify). For home networks, get the fastest you can reasonably afford, and know you may want
faster down the road.
I have been in a situation is some of the work environments where I
have had to trace where one out of over 100 cables went, and the cable I
was interested in along with all the cables around it were blue. I can not
picture running into that many cables at home, but I have been fairly
careful to make sure each Ethernet cable I have bought has been a
different color. So far I have been able to get enough different colors
that I have not had to repeat, but if it does come to that, at least at
worst I will only be dealing with say two red cables in a group of
many.
The tools I have found to be of greatest value for this project
have been:
- A range of manual screwdrivers.
- An electric drill (Black & Decker) with a long 1/4" drill bit and a
short 1.5" drill bit.
- A bit and brace. This is a style of pre-electric manual drill.
- A cordless mini-drill/grinder (Dremel). Nowhere near the
power/size to drill many of the critical holes needed for this
project, does do a nice job on pilot holes for screws and sanding
rough bits left by other tools.
- Tape measure. 25 feet long.
- An electric jig saw (Black & Decker) with both wood cutting and
metal cutting blades.
- A wire stripper. I've looked at the top of the line wire strippers
that are supposed to easily automatically do a perfect job of stripping
insulation off cables. In my experience they don't work well. So I
use one of the cheapest manual wire strippers on the market. Yes it
takes a bit of practice to use well, but with a bit of practice it does
work very well.
- A continuity tester. It would be nice to think that all cables were
built to spec, and that all cable connectors came with clear
documentation. In the real world it doesn't always happen and we need to
sort out where wires really are going. Canadian Tire sells what
looks like a modified flashlight for doing continuity testing in car/truck
wiring (I've used it, it works reasonably well for cable testing and it's
cheap). Normally however I use a low-end digital multimeter which I got on
sale at Radio Shack (it makes a "chirping" sound when I have a
complete circuit).
- Vacuum cleaner (Shop-Vac). Some of this work will produce a lot of
dust that needs to be dealt with.
If I were buying all of my tools new, I would be more likely to get
a good cordless electric drill. But, I've seemingly always had the bit and
brace (which I got from my grandparents), and when I got the electric
drill it seemed like all my drilling tasks would be within easy reach of
an electrical outlet. In parts of the attic the bit and brace were
much easier to deal with than stringing extension cords.
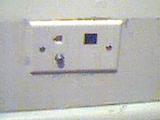
The network jacks, Leviton is best known to do-it-yourselfers as a
maker of nice looking electrical switches and outlets for home electrical
projects. They also, and for our purposes much more interestingly make a
line of networking/phone/coax cable jacks that are near ideal for the home
network builder.
Under the tradename of "QuickPort" Leviton offers wall plates that will
fit over standard (North American anyway) electrical outlet boxes (ie:
the sort of boxes that are put into the wall to hold light switches or
electrical outlets). A "QuickPort" wall plate will have (depending on
model) anywhere from 1 to 6 square holes punched out of the plate. Into to
those square holes you can mount a range different connectors, ranging
from Cat 5 cable connectors, phone jacks, to cable TV connectors, among
others. As well there are blank square covers, in case you want to install
say a 4 port plate, but at the moment only need 3 functions (which
happened in one of the bedrooms (pictured above) where I put in a Cat 5
Ethernet jack (in black), a phone jack, a cable jack, and a blank slot for
future options).
There are other companies that sell "QuickPort" compatible jacks, for
example, from one of the local surplus stores I got several RCA
labeled Cat 5 jacks that have been satisfactory.
In my experience finding local retail vendors for the Cat 5 "QuickPort"
(or QuickPort compatible) jacks is very easy, phone jacks are not hard to
find, cable TV connectors/blank square covers could be found, and
everything else a challenge to find locally. Some of these items have shown up at some of the dollar stores, for litteraly a dollar an item. The
BNC connectors that I use
for my amateur radio stuff were all bought via Smarthome a
mail-order firm.
Doing an easy install. One of the "rules" of the North American
construction industry is (and has been at least back to the 1920's) is
2"x4" (normally wood, sometimes steel) wall supports are set 16" on center
apart. This means that if you know where the centre of a 2"x4" wall
support (or "stud") is, the centre of the next one will be 16" away. This
is not a prefect "rule" in that due to such things as door and/or window
openings exceptions are made. Still, while not a prefect way to find your
way around, it isn't bad either.
For the main jack in the master bedroom what I did was assume that the
interior wall closest the outside wall was point zero and then measure off
in several multiples of 16" and then add 8 inches. Then I drilled a small
pilot hole into the baseboard (never one larger than I was willing to
think about filling with plastic wood...). Next poke wires into the hole
to make sure I was indeed in the more-or-less middle of an empty stud
cavity, and then using my electric jig saw cut out an opening for a
"Posi-Mount" bracket (which supports the "QuickPort" jack). Next using the
same distance from the outside wall as a guide, I went into the attic and
drilled a hole into the top of the stud cavity in order to run wires
to/from Quickport jacks.
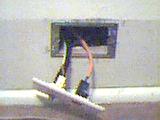
A
brief note about "Posi-Mount" brackets. These are stamped metal brackets
that have the same size opening as a standard electrical wall box. The
idea is that when one is working with "communications" wiring you don't
need to take the same precautions as with electrical wiring, as there are
no voltages here that could get you killed. The advantages of a
"Posi-Mount" bracket over a conventional wall box are that you still have
full access to the wall cavity and they are cheaper. Attached to this
paragraph you will see an example of a "Posi-Mount" bracket. The bracket
does come with two metal tabs to help clip the bracket to drywall (not
needed in my situation, so they were cut off).
Since I was putting in a QuickPort jack in one of the other bedrooms on
the opposite side of the wall from the master bedroom, I drilled a hole
from the master bedroom hole into the other bedroom. Then using the
electric jig saw I cut a second opening the right size for a
"Posi-Mount" bracket. This all meant that I could have two wall jacks
for one hole in attic (a good thing in my books).
Fishing cables through a wall is an art unto it's self. Some cable
types can be pushed down from above and end up more or less where you want
(like Cat 5 cable), other cable types I found like phone cable seem to
have an evil mind of there own and had to be pulled up.
The way I ended up doing the phone cables/coax cables was to go into
the attic, take a piece of Cat 5 cable, secure one end with tape, push the
other end down from above. Then I would go down into the bedroom, get the
end of the Cat 5 cable I had pushed down pull it slightly into the
bedroom, put the but end of the cable I wanted to go up against the end of
the Cat 5 cable and carefully tape the two together. Then I slide the
cable into the opening and make sure they were clear of any problems. I
would also make sure the cable was positioned so that it would not get
tangled as it was pulled up. Then I would go into the attic and carefully
pull the Cat 5 cable up. In my early tries (while I learned the hard way
exactly how to do things), I had a few cases where I had cables fall off
as I was pulling them up through the wall (and I would have to start all
over). Time consuming, but with a bit of practice, not very hard.
After this it was easy, screw the "Posi-Mount" brackets into place,
connect up the cables to the "QuickPort", connect the cables up to
their respective hubs elsewhere in the attic, and done.
Getting cables from basement to attic however was a major task in
itself...
The route to the attic. When the house was built and for many years
after there was a small water tank just below the ceiling in the master
bedroom closet. The idea I gather was that in order to maintain water
pressure for the hot water radiator system, water was supposed to
occasionally be feed into that tank, and then any loss of water in the
system would be made up for from that tank. In case too much water was
feed into the tank there was a overflow pipe that would take that overflow
into the attic and then carry it down to the basement (where it would be
poured onto the basement floor). A few years ago the old furnace was taken
out, and a new furnace that didn't need that water tank was put in. The
master bedroom closet water tank was taken out, but the (now unused)
overflow pipe was left in place.
When I started looking into the question of a home network I was
vaguely aware of the extra set of pipes, and the question did come to
my mind if that might be the way to run a cable from basement to
attic. The full answer would take a lot longer and be a lot harder than I
expected.
The first step to all this was to (thanks to electric jig saw and metal
cutting blade) cut away the unneeded bits of pipe in the attic (where
there was some provision for air to get into the system). Then I cut away
the excess pipe in the basement (where there was a pipe to take the
overflow water close to the drain in the middle of the basement).
Tests doing things like pouring water into the pipe in the attic and
seeming almost instantly getting water into a bucket down in the basement
showed I had the right pipe. However efforts to run a cable down proved
fruitless. After much time/effort I was able to get a length of fishing
line with a small weight at the end down (helped by having a vacuum
cleaner "pull" the line down). In spite of many different tries in many
different ways I could not pull a Cat 5 or even a phone cable up the pipe.
In other words it became clear that there was some sort of kink in the
pipe.
My next step was to carefully remove the floor molding in the master
bedroom closet (so it could be replaced later), behind where the overflow
pipe ran. Next I cut away much of the plasterwork and boards that had
supported the plaster behind the molding. Then I cut the overflow pipe
off. To get rid of that section of overflow pipe I pulled up the overflow
pipe as far as I could into the attic (but due to the slope of the roof
and how close the overflow pipe was to the outside wall I could not take
all the pipe up in one shot), clamp the pipe with Vice-grips, and cut the
pipe off just above the Vice-Grips, and then repeat the process until I
had removed that entire length of overflow pipe.
This did not get me out of the problem of getting cable from basement
to attic as the kink in the pipe was not part of the pipe I removed. So,
next up was to take out (carefully so it could be replaced latter) more of
the molding in part of the master bedroom closet, and part of the
flooring.
[still to be written]
The finished part of the basement, [still to be written]
The Hubs: Hubs are where the cables from a number of different
computer networking jacks come together and are interconnected. On paper a
single hub could provide for all the connections required for a
house. However, in some houses (such as where I am) having a second hub
makes life MUCH easier. Keep in mind that you are limited to a maximum
of three hubs per network (however if you have the right sort of
router you could set-up multiple networks in your home, each with upto
three hubs, but that sort of discussion is far beyond the scope of
most home networks).
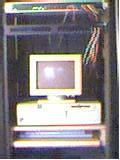
The main
hub (a 16 port Acer Hub) is down in the basement in a central
readily accessible spot. Every networking jack in the basement and ground
floor connects into this hub. In the photo attached to this paragraph,
you will see the basement rack with the hub at the very top, and under
that you will see the old Dell PC (with a monochrome VGA monitor) that
act as my router. On the shelf under the PC is stored the cable modem
box and keyboard for the PC.
On paper I could have run the cables for five networking jacks that I
wanted connected in second floor bedrooms up into the attic and then down
to the basement. The problem I faced was that I only had a very small path
from basement to attic which meant that running say five Ethernet cables,
plus phone lines, plus amateur radio coax, plus leaving some room for
further expansion just wasn't an option. But running one Ethernet cable
from the basement to a small second hub in the attic was an option. Then
running the cables out from the small attic hub to where I wanted them in
the bedrooms was fairly straight forward.
The attic hub is an 8 port OvisLink hub. The hubs I chose were
picked on the bases of being a good value for the money/reliable. But do
keeping in mind the money here is modest. There are faster/better hubs,
such as the (very nice, and very expensive) switching hubs from
3Com but unless you are doing something very strange at home, these
are near absurd overkill.

The attic is
unheated and unfinished, so I wanted a way to both protect and keep the
little attic hub warm. In searching through the basement I found a wooden
boot box (ie: a box that boots had once been sold in). There was no lid to
the box, but I did have some scrap Plexiglas that was more than large
enough (and a brief encounter with my electric jig saw got it down to just
the right size). This old boot box and it's Plexiglas lid is now home for
my attic hub. Holes that had been put into the box for a rope carry handle
were filled in with some plastic wood. For warmth, I made sure there was a
thick layer of insulation on top of the box and only a thin ceiling
between the box and the rest of the house. To allow cables to run in under
the insulation while stopping dust and seriously discouraging insects I
got a few plastic conduit pieces from a local building supply shop.
Normally plastic conduit is used to protect electrical wiring that is
being run outside residential buildings (ie: within reach of curious and
sometimes stupid people/animals). The image attached to this paragraph
shows the box with the insulation (temporarily) removed, and the box
propped up for the camera.
The router: In a home network context you normally want a router
to be performing (at least) four functions. Namely:
- Routing. When you want to send a file from a computer on a laptop in
the bedroom to a desktop computer in the den you don't want the file
to be sent out over the internet. On the other hand, move that same
file to client's computer the other side of the world and you will
want it to go over the internet. That is the key to routers, boxes
that decide where (if anywhere) a message should go. In a home
network situation the routing questions are typically very simple, local
traffic between two home machines (which for internet connectivity can
just be ignored), and everything else that should be passed over the
internet. Questions that one will run into at some larger commercial
sites (like which of several Internet connections is the one to use
when you have a message for the outside world) can be ignored in this
context...
- IP Masking. Most ISPs, be they dial-up or high speed either only
provide one IP number (in essence the internet's equivalent to a phone
number), or charge significantly extra for additional IP numbers. With IP
Masking you can have many machines in your home all appearing to the
outside world to share the same IP number. This is the trick of IP
masking, and most home networks will want it badly.
- Security. There is no way to make a network perfectly safe, but there
are ways to reduce risk. One route is to get a firewall machine.
Alternatively, IP masking, because of the IP number dances that need to be
performed, if properly configured, can offer the same security as a
firewall, while performing another much wanted service.
- Media/Protocol conversion. If your home network is all 10-Base 2 ie:
coax cable (something I would not recommend for MOST home networks) and
the cable modem box you have requires a 10-Base-T connector cable, well
the router is the box to handle this conversion. Similar story if you are
using a dial-up modem between your network and the internet, the router
handles the 10-Base-T to serial connection. As well, if the ISP demands
that all connections are done under the PPPoE (Point to Point Protocol
over Ethernet) protocol, then the router makes sure this happens.
My view is that a machine acting as a router should be keep as simple
as possible and be running as few services as possible. The less that is
running on the router means the less that can break (or be broken by
hostile outsiders). Still there are those who disagree with this view, so
you will find some people running other services on their router (such as
DNS servers and/or DHCP servers, services I feel should be hosted off
another machine).
There are commercial routers that will (at least for high speed
internet connections) do the four tasks listed above, drop dead easy, but
not cheap. For my home network I originally set-up a Linux Router Project
machine to do these tasks, very cheap, not hard, but not the drop dead
easy of some of the commercial offerings. Since then I have shifted to
Coyote Linux (which is based on the Linux Router Project, and I am looking
at a more recent variation of the Linux Router Project, Bering).
The connection that I am using is a DSL connection
(Toronto Free-Net). Cable modem and phone company ADSL connections should
both be able to provide comparable high speed connections. On paper
however when performance issues do show up, the phone company should have
an easier time fixing things. In practice, the key question is how well
did the company in question set things up. As of this writing (November
2010) the better implementation job in the Greater Toronto Area appears to
have been done by the DSL providers, thus what I went with.
Originally I used an old PC and software from the Linux Router Project / Coyote Linux. This worked well, but I have since gone with an old
Linksys WRT54G router with Tomato Linux software installed. With the old WRT54G and Tomato Linux I get the same sort of flexibility as Coyote
Linux in a much smaller / lower power consumption package.
Theory, There are three blocks of IP numbers (the non-routable IP
numbers) that all good routers know never to forward on to other
locations. The idea being that firms wanting to set-up internal networks
with internet software/systems know that if there is a mix-up and their
networks are by mistake connected to the internet the mistake will not
cause disruption elsewhere. Where we want internal networks that only have
(via IP masking) one routable IP number visible to the outside world these
non-routable blocks perfect for our purposes. You can assign the all
computers in your home network IP numbers from any one of the non-routable
IP number blocks and the IP masking box will make them all appear to the
outside world as a single ISP assigned "real" IP number. The non-routable
blocks of IP numbers are:
- 10.0.0.0 - 10.255.255.255 (1 class "A" network)
- 172.16.0.0 - 172.31.255.255 (16 class "B" networks)
- 192.168.0.0 - 192.168.255.255 (256 class "C" networks)
In my case I assigned all the computers on my home network IP numbers
between 192.168.1.0 and 192.168.1.255. This was all a mental flip of a
coin as any of the networks in any of the other above blocks of numbers
could have been used just as easily and worked just as well. Thanks to the
of trick IP masking every residence on my street could use the same
192.168.1.x block of IP numbers, and I would neither notice or care. All
the outside world sees of my home network is the ISP assigned routable IP
number.
Documentation In my case I keep a three ring binder with the
following things in it:
- A Network summary page with the following information listed:
- A list of all the computers that are on or visit the network,
their IP numbers and names.
- A list of the network cables by hub, their color and where they
go.
- A list of computer names that I like and have not used.
- A to-do list of future projects.
- A sheet with the various IP number, server settings from my ISP
- A small booklet from Leviton on low voltage wiring
Given the amount of trouble I went to in all this, I got a very nice
looking blue and white 3 ring binder. I took the view that I went to a
fair bit of trouble to put the inside together, so the outside should
reflect that.
Useful Toronto Area Networking Vendors:
Surplus:
- Above All Electronic Surplus 602 Bloor Street West,
416-588-8119. Good for used PC systems, some new parts
- Active Surplus Electronics 347 Queen Street West,
416-593-0909. Excellent for cables, machine screws.
Do keep in mind that that with surplus dealers that you never know
where this stuff has been, what it has been through, So when dealing with
these shops, do your homework in advance, do ask questions, and do keep
you wits about you. You can at times come away from these places with
great bargains, or if your not careful you can end up with over priced
trash.
New parts
- Canadian Tire Many locations. Tends to be more expensive than
some of the "big box" retailers. Some test equipment and tools (especially
if on sale) can be worth getting from these people.
- Active Components 3790 Victoria Park Ave., Suite 100,
416-498-9886 (and other locations across North America). Except for racks, and
complete PCs these people seem to have almost everything a home network
builder would want/need listed in their catalogue. Somewhat pricey. Retail
arm of Future Electronics.
- Black Box 2225 Sheppard Ave., 16th Floor, Toronto ON M2J 5C2 416-490-7100 (and other locations around the world). Normally my very
last choice for parts, as they are normally absurdly EXPENSIVE. They do however
have some exotic parts/tools that I have not been able to find elsewhere
(ie: why I mention them at all).
- Sayal 3791 Victoria Park, 416-499-2889 (also a
location in Mississauga). One of my first choices for connectors and wall
plates. Normally a better selection than the surplus places, and prices
only slightly higher than the surplus places.
- Misco Canada 171 Esna Park Drive, Markham, Ontario,
800-661-6472. Except for some a small number of connectors/cables (like
QuickPort compatible coax connectors) everything a home network builder
would want/need (including racks/complete PCs). These people do tend
strongly towards high performance/cost equipment. Prices however seem
reasonable for what they are offering. They do offer mail order
service.
- The Source Many locations. Never my first pick for
equipment/parts as they are normally much too expensive, but when you are
desperate for something NOW or they have something on sale, they can be
useful.
My only relationship with the above firms is as a (normally)
more-or-less happy customer.